Visit Japan Web (VJW) Guide for Filling Out Japan Arrival QR Code
“Visit Japan Web” (abbreviated as VJW) is an electronic system for arrival declaration and customs declaration launched by the Japanese government in 2022. Before arriving in Japan, travelers can use this system in advance to fill out and submit arrival and customs declarations for themselves and their accompanying family members, generating a Japan Arrival QR Code. This eliminates the need to spend time filling out forms upon arrival. Additionally, it can serve as proof of tax exemption when shopping in Japan, replacing the need to present a passport.

This article is a Visit Japan Web guide, providing detailed and clear explanations for all aspects of filling out Japan’s arrival and customs declaration forms. By following the steps in this VJW guide, you can easily complete the arrival declaration process for Japan and successfully generate the Japan Arrival QR Code. To help readers quickly find the information they need, the following table of contents is provided. Click on the links to jump to the relevant sections.
Table of Contents
Note: The original article was written in Chinese, so the screenshots in this article are from the Chinese version of Visit Japan Web. However, the steps are the same for all language versions.
What is Visit Japan Web?
After COVID-19, Japan’s arrival requirements have not changed. The rules and procedures for foreign travelers entering Japan remain largely the same, including the need to fill out an arrival declaration form and a customs declaration form. However, in 2022, the Japanese government developed an electronic arrival declaration system called “Visit Japan Web.” Now, travelers can use this system to submit arrival and customs declarations electronically and generate a Japan Arrival QR Code.
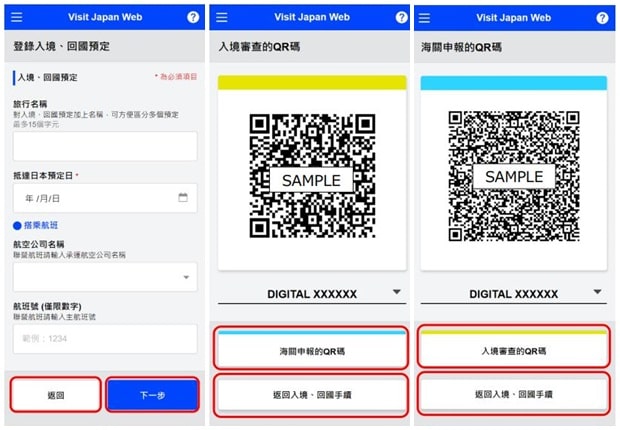
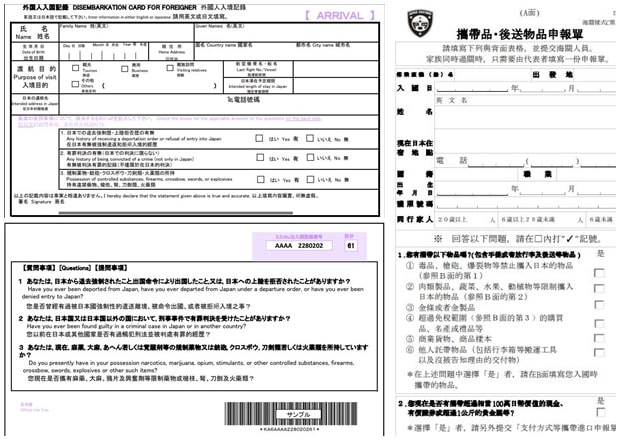
Although the electronic “Visit Japan Web” system is now available for submitting arrival and customs declarations, paper forms are still an option. If you prefer not to use the electronic system, you can still fill out paper forms. However, paper forms are no longer distributed on flights to Japan. If you wish to use paper forms, you will need to pick them up at the arrival counter’s form-filling area, which can be inconvenient and time-consuming. Therefore, remember to complete your declarations in advance using the new system before traveling to Japan.
Frequently Asked Questions
Although filling out arrival and customs declarations is not a new requirement for entering Japan, the shift from paper forms to the electronic “Visit Japan Web” system is new for many travelers visiting Japan for the first time post-pandemic. As a result, many people have questions when using VJW to complete these declarations. Below are some of the most common questions.
Q1. Is there a mobile app available for download?
Ans.: “Visit Japan Web” does not have a mobile app, so there is currently no app, only a web version. The official website previously issued a notice warning about a fake app circulating online and advising users not to download or install any apps from untrusted sources.
Q2. Is there a Chinese version?
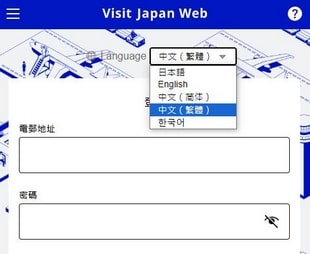
Ans.: Currently, the system is available in five languages: Japanese, Traditional Chinese, Simplified Chinese, English, and Korean.
Q3. How far in advance can I apply?
Ans.: As long as you have the required information, you can fill out the arrival and customs declarations at any time before entering Japan. For the arrival declaration, you will need to provide your flight number and your address in Japan (e.g., hotel address). Once you have these details, you can proceed with the declaration. If your plans change and you do not enter Japan, there is no issue. However, if your passport requires a visa, you must wait until you obtain the visa before submitting the declaration, as some information can be automatically retrieved from the visa data.
Q4. Does everyone need their own account to submit declarations?
Ans.: Officially, the system encourages each person to use their own account for arrival and customs declarations. However, if a family is traveling together, one account can be used to submit declarations for all family members, meaning accompanying family members do not need to register separate accounts.
Q5. How does Visit Japan Web define “accompanying family members”?
Ans.: “VJW” does not provide a strict definition of “accompanying family members,” but it mentions that allowing family members to use the same account is intended to assist children and elderly individuals who may not be able to register and fill out declarations on their own. In practice, as long as they are family members, spouses (husbands or wives of the account holder) and adult children can also be included in the same account for declarations, such as a couple traveling with a young child.
How to Use VJW for Japan Arrival and Customs Declaration?
“Visit Japan Web” is an online declaration system, but it is only available as a web version, with no mobile app. When using it, it is recommended to bookmark the website on your mobile browser for easy access or keep the webpage open. The system is currently available in Japanese, English, Korean, Traditional Chinese, and Simplified Chinese, so you can choose your preferred language.
You do not need to wait until arrival in Japan to complete the arrival and customs declarations. You can submit the declarations at any time before your trip to Japan.
For the arrival declaration, you will need to provide your flight number and your address in Japan (e.g., hotel address). Once you have these details, you can proceed with the declaration. If your plans change and you do not enter Japan, there is no issue. However, if your passport requires a visa, you must wait until you obtain the visa before submitting the declaration, as some information can be automatically retrieved from the visa data.
“Visit Japan Web” is not simply an electronic version of the paper arrival and customs declaration forms. Instead, it reorganizes the declaration process into several steps. This allows travelers to save relatively fixed information (such as personal details and passport information) for future use. For frequent travelers to Japan, this means they do not need to re-enter the same information each time, only the details specific to that trip. However, for those who visit Japan only occasionally, filling out paper forms might be simpler.
Below are the steps for completing the arrival and customs declarations. The process generally includes the following stages:
- Before Arrival
- Register an account
- Enter personal information
- Enter information for accompanying family members (if applicable)
- Enter arrival details
- Fill out arrival inspection and customs declaration
- Upon Arrival
- Present the Japan Arrival QR Code at the immigration counter
- Present the Japan Arrival QR Code at the customs counter
- After Arrival
- Create a tax-free QR Code (if needed)
- Present the tax-free QR Code when shopping (if eligible for tax exemption)
Most features of the system require an internet connection, such as registering an account, entering personal and arrival details, filling out arrival inspection and customs declarations, and creating a tax-free QR Code. However, displaying the Japan Arrival QR Code (for arrival inspection and customs declaration) can be done offline, but you must log in to your account and keep it active while online beforehand.
1. Register an Account
To use the “Visit Japan Web” service, you need to register an account. The steps are as follows:
【1】 On the login page, click “Create New Account,” agree to the terms of use, and then click “Next.” Enter your email address and set a password, then click “Create Account.”
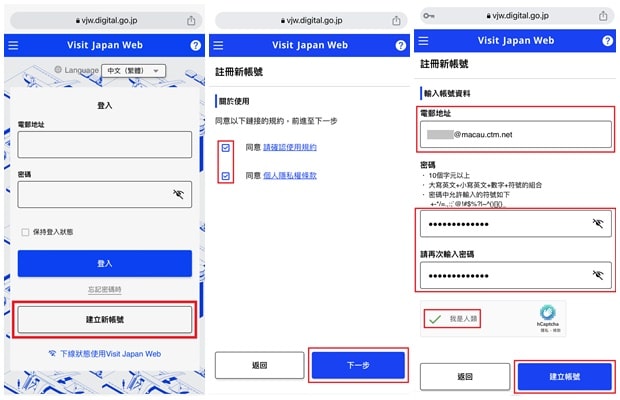
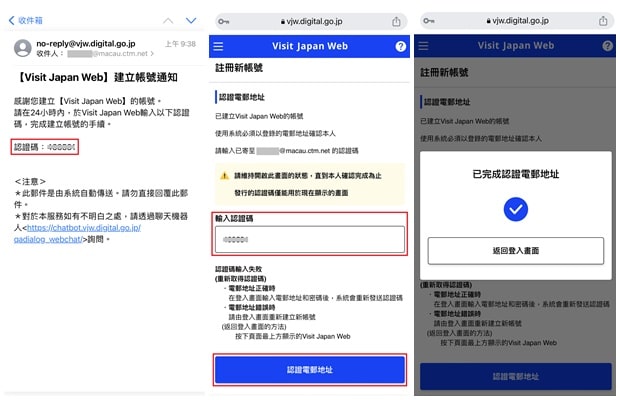
【2】 You will be redirected to a page to verify your email address. An email with a verification code will be sent to your email address. Enter the code on the webpage and click “Verify Email Address.” Once verified, your account registration is complete.
2. Enter Personal Information
After registering an account, you can enter your personal information, primarily the details from your passport. The steps are as follows:
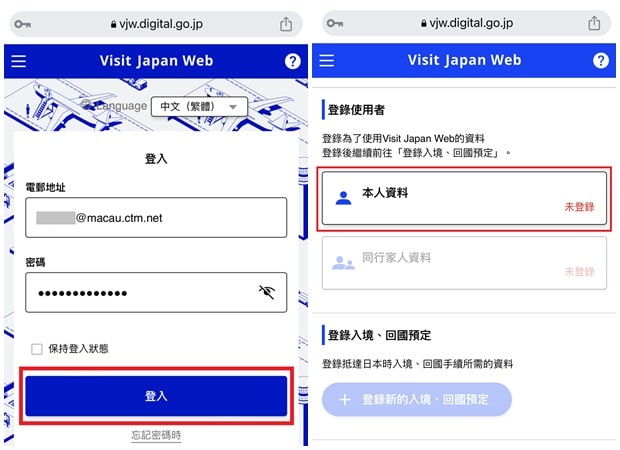
【1】 Log in to your account with your email address and password, then click “My Information” under “Register User” to enter your details.
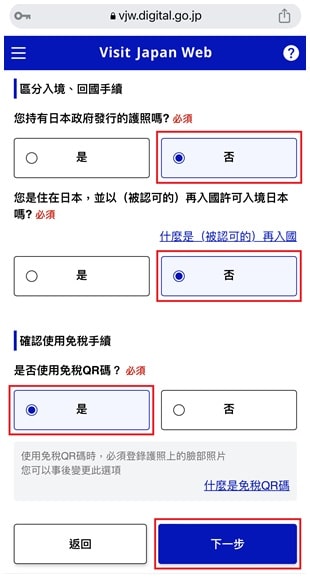
【2】 Answer questions such as “Do you hold a Japanese passport?“, “Do you reside in Japan with re-entry permission?“, and “Do you need to use the tax-free QR Code?“, then click “Next.”
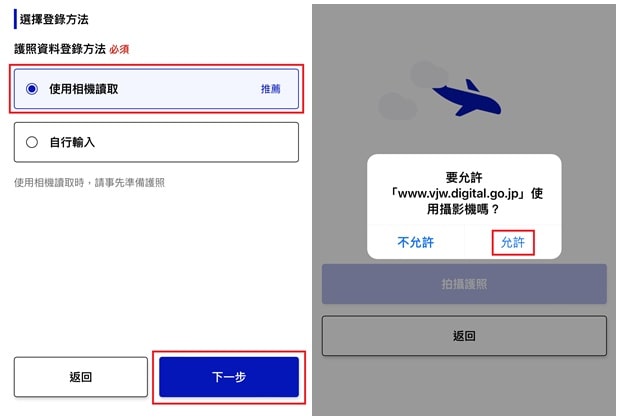
【3】 Enter your passport details. You can manually input the information or take a photo of your passport for the system to read the data. Using the photo method is recommended to simplify the process. Additionally, if you plan to use the tax-free QR Code feature, you must use the photo method to capture the personal photo from your passport.
To take a photo, ensure your mobile browser has permission to access the camera. Select “Use Camera,” then click “Next.” Take a photo of the passport’s information page, ensuring the entire page is captured and the head is within the marked frame.
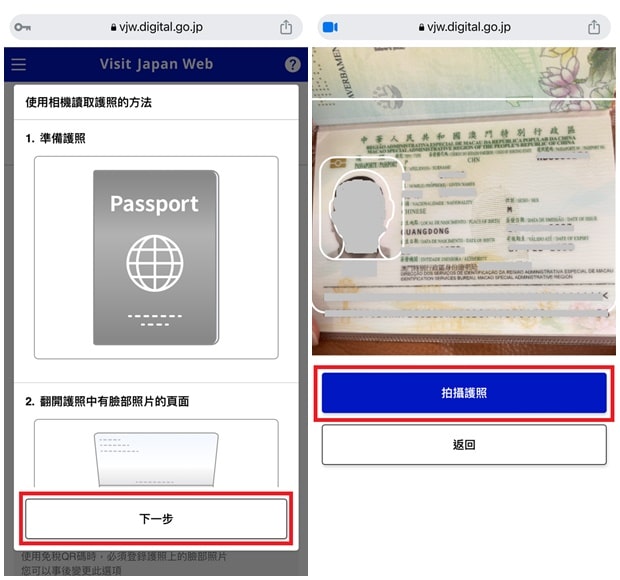
【4】 After taking the photo, the system will extract details such as your passport number, name, nationality, date of birth, and passport expiration date. If the system reads any information incorrectly, you can manually correct it. If you selected “Yes” for “Do you need to use the tax-free QR Code?“, the system will also capture the personal photo from your passport. Once you confirm the details are correct, click “Next.”
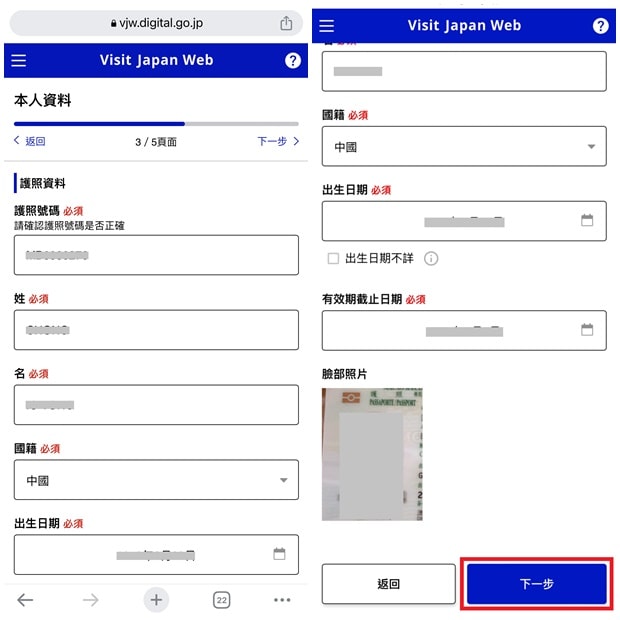
【5】 The final page will display the information you entered. If everything is correct, click “Register” to complete the personal information entry.
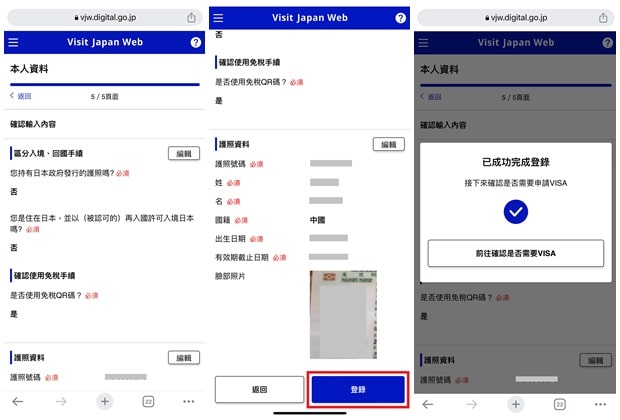
After completing the personal information entry, the system will guide you to a page to confirm whether you need to apply for a Japanese visa. If your passport qualifies for visa-free entry, you can ignore this or select “No” on the VISA confirmation page.
Generally, personal information does not need to be re-entered for each arrival unless it has changed. For example, if you renew your passport, you will need to update your registered information.
3. Enter Information for Accompanying Family Members
A single “Visit Japan Web” account can be used to submit arrival declarations for multiple people. If you are traveling with family, it is recommended to enter everyone’s information and submit declarations under one account. This ensures that all family members can complete arrival procedures together. If each person uses a separate account, they will need to go through the process individually.
Note: Although the website states that only family members who cannot complete the process independently (e.g., infants or elderly individuals) can be registered as accompanying family members, in practice, any family member, including adults, can be included.
The steps to register accompanying family members are as follows:
【1】 On the account homepage, click “Accompanying Family Members” under “Register User,” then click “Add.”
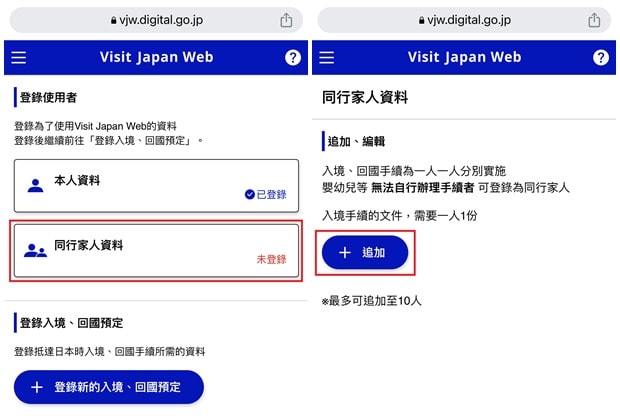
【2】 The subsequent steps are identical to entering personal information. Answer questions such as “Do you hold a Japanese passport?“, “Do you reside in Japan with re-entry permission?“, and “Do you need to use the tax-free QR Code?“, then take a photo of the passport to read the data and complete the registration.
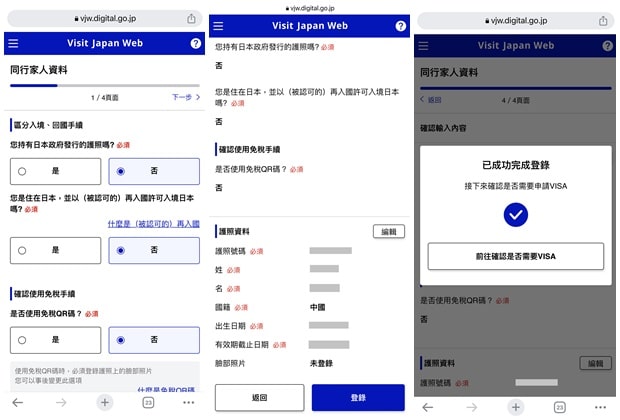
If there are multiple accompanying family members, repeat the above steps for each person.
4. Enter Arrival Details
Arrival details include basic information for entering Japan, such as the arrival date, flight number, and address in Japan (e.g., hotel). These details vary for each trip, so they must be re-entered for each arrival.
The steps to enter arrival details are as follows:
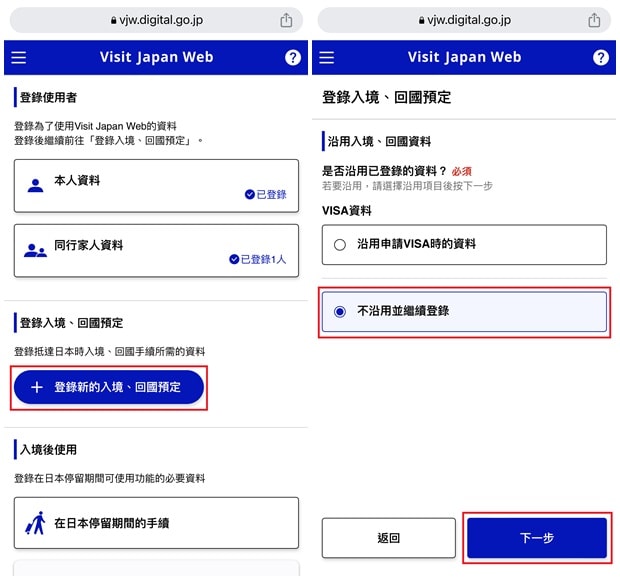
【1】 On the account homepage, click “Register New Arrival/Return” under “Register Arrival/Return.” Choose whether to use VISA data, then click “Next.” (Note: If you have applied for a Japanese visa and received it, you can select “Use VISA Application Data.” If your passport qualifies for visa-free entry, select “Continue Without Using VISA Data.” If you have used the system before, you will also be asked whether to reuse previous arrival details.)
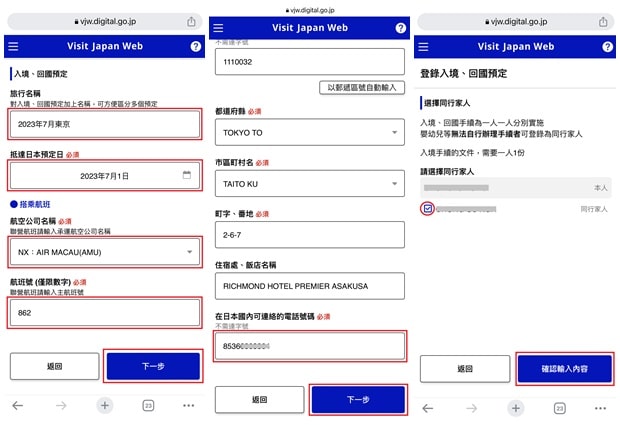
【2】 Assign a name to your trip (optional for easy reference), then select the arrival date and flight number, and click “Next.” Next, enter your address in Japan. If staying at a hotel, provide the name of your accommodation. If staying at multiple hotels, enter the address of the first hotel or one of them.
The address must be entered in English. You can start by entering the postal code and clicking “Auto-Fill by Postal Code” to automatically fill in part of the address. However, the street number and hotel name must be entered manually. Finally, provide a contact phone number in Japan (you can use your home country’s mobile number with the country code), then click “Next.” If you have registered accompanying family members, select them, then click “Confirm Details.”
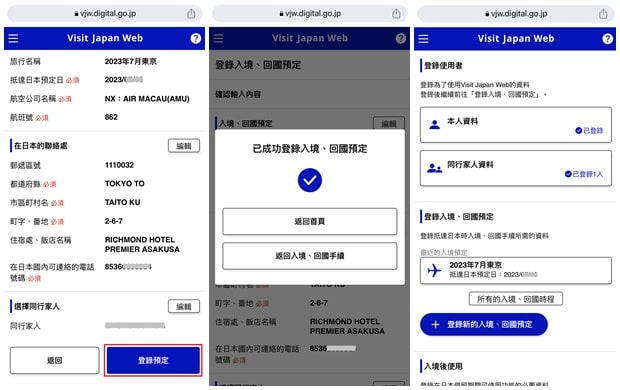
【3】 The final page will display the information you entered. If everything is correct, click “Register” to complete the arrival details entry. Upon returning to the account homepage, you will see the registered arrival plan.
5. Fill Out Arrival Inspection and Customs Declaration
After entering personal and arrival details, you can proceed to fill out and submit the “Arrival Inspection and Customs Declaration,” which corresponds to the paper arrival declaration form and customs declaration form (Baggage and Unaccompanied Articles Declaration). Each traveler must submit their own arrival inspection and customs declaration. However, the customs declaration section can be shared among all accompanying family members, meaning only one person needs to complete it for the entire family.
The arrival inspection and customs declaration can be submitted at any time before arrival. Once submitted, the declaration will be saved in the system, and you can present the Japan Arrival QR Code upon arrival to retrieve the record. If you do not enter Japan after submitting the declaration, there is no issue, as the record will expire and be deleted if unused.
The “Arrival Inspection and Customs Declaration” consists of 16 pages, but each page requires minimal input. Most basic information is automatically filled in from your registered personal and arrival details, so the process is quick, typically taking 1-2 minutes. If sharing a customs declaration with accompanying family members, the form is reduced to 5 pages, completing in under a minute.
If traveling with family, it is recommended to complete the arrival inspection and customs declaration for the primary member first, selecting “Share Baggage and Unaccompanied Articles Declaration with Accompanying Family Members.” This way, other family members do not need to complete the customs declaration separately.
The steps to fill out and submit the arrival inspection and customs declaration are as follows. Steps 【2】~【5】cover the arrival declaration, while steps 【6】~【8】cover the customs declaration.
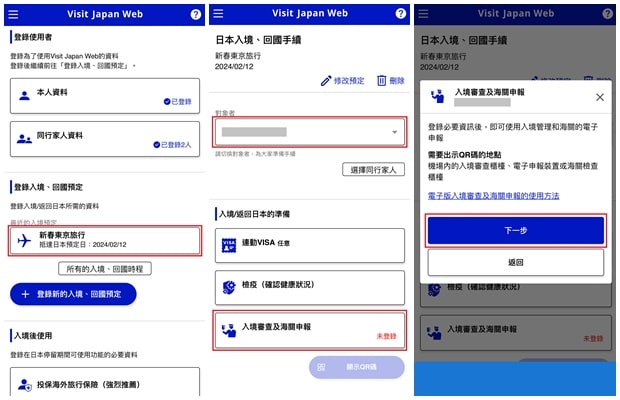
【1】 On the account homepage, click the registered arrival plan, then select the traveler for whom you are filling out the declaration (if multiple family members are registered, all names will appear in the dropdown menu). Click “Arrival Inspection and Customs Declaration,” then “Next” to begin.
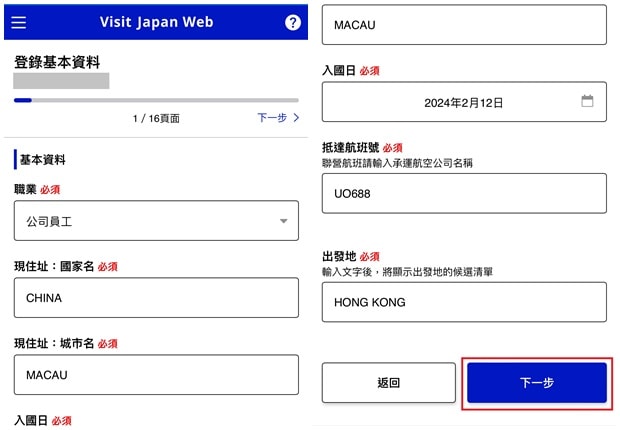
【2】 Enter the traveler’s occupation, foreign address (only the country and city are required, and the address must be entered in English, not Chinese), and departure location. The arrival date and flight number are automatically retrieved from your registered arrival details and do not need to be entered manually. Click “Next” to proceed.
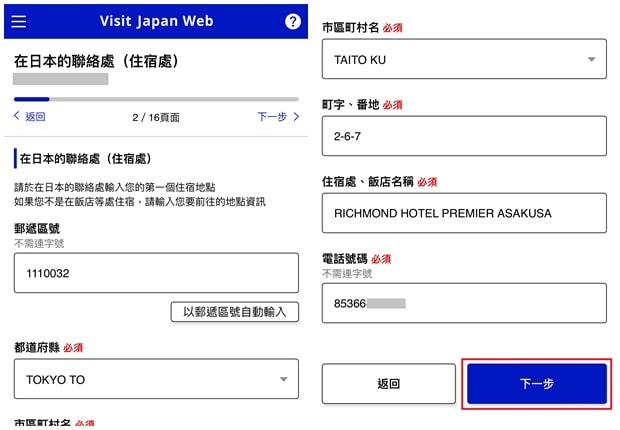
【3】 The system will retrieve your accommodation address and contact number in Japan from your registered arrival details. Confirm the information is correct, then click “Next.”
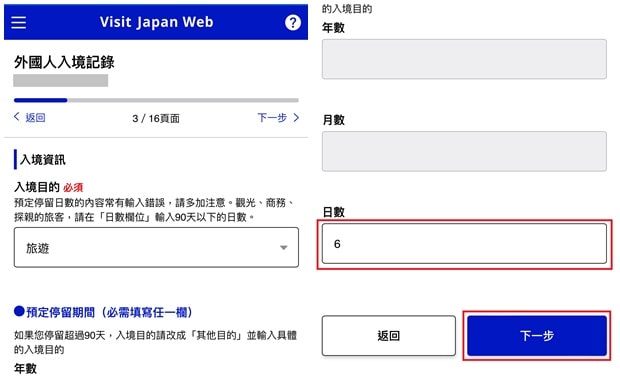
【4】 Select the purpose of arrival (e.g., “Tourism”) and enter the planned duration of stay (e.g., if your trip lasts 6 days, enter “6”). Click “Next” to proceed.
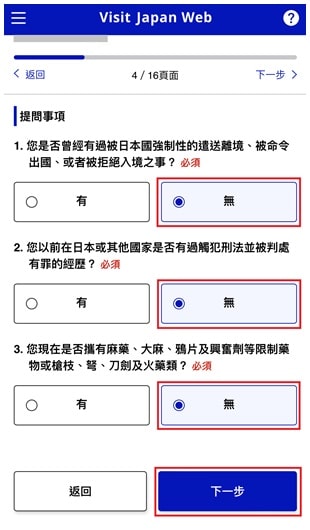
【5】 Answer three questions: “Have you ever been denied entry to Japan?“, “Have you ever been convicted of a crime?“, and “Are you carrying prohibited items?” Then click “Next.”
【6】 After completing the arrival declaration, proceed to the customs declaration. The arrival declaration is per person, but the customs declaration can be submitted per family, meaning only one customs declaration is needed for the entire family. If you have registered accompanying family members, the system will ask whether to include them in the customs declaration. If yes, select “Yes” and click “Next.”
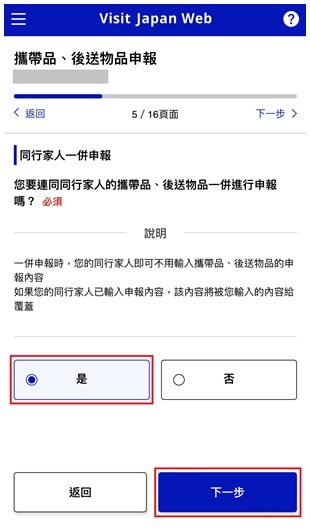
Note: If accompanying family members are included in the customs declaration, only the first person to submit the declaration needs to complete the customs section. Other family members will not see steps 【6】~【7】 when filling out their declarations.
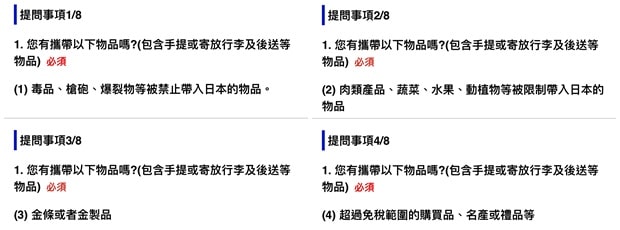
【7】 Next, there are 8 questions about the items you are bringing into Japan, primarily regarding whether you are carrying prohibited items, large amounts of cash, or goods exceeding the duty-free allowance. If none apply, simply select “No” for all.

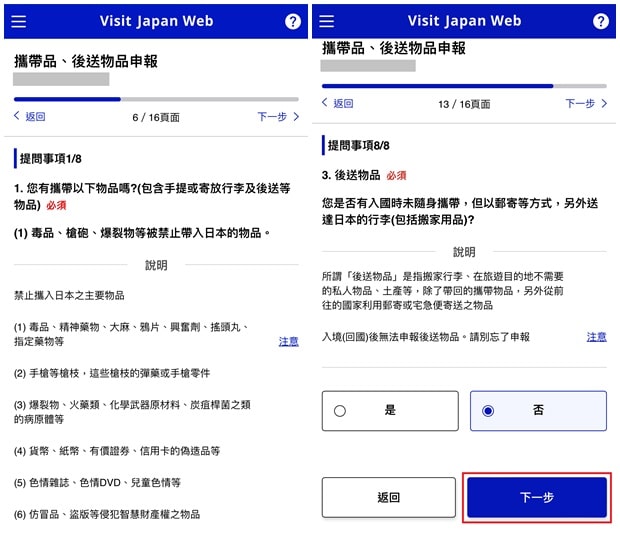
【8】 Finally, review all the declared information for accuracy, including the details filled in the previous steps and the passport number, name, date of birth, etc., extracted by the system from your registered personal data. Then, check the box for “The above information is correct,” and click the 「Register」 button to submit your immigration and customs declaration.
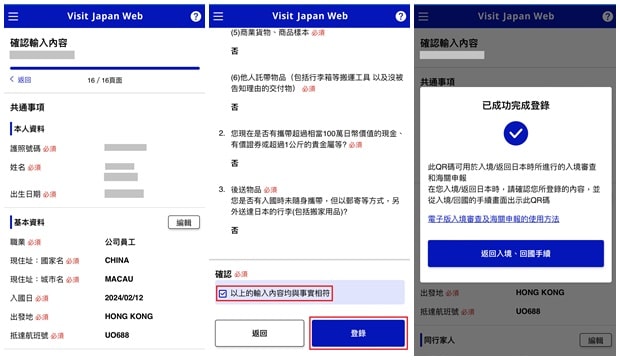
Each traveler must complete and submit a separate immigration and customs declaration. If your account includes family members traveling with you, you’ll need to fill out and submit a declaration for each person. However, if family members are included in the same customs declaration, only the first declarant needs to complete the customs section—the others do not need to repeat it.
After submitting the immigration and customs declaration, when returning to the planned entry items page, you’ll see the 「Immigration and Customs Declaration」 marked as “Registered,” along with a 「Show QR Code」 button below it.
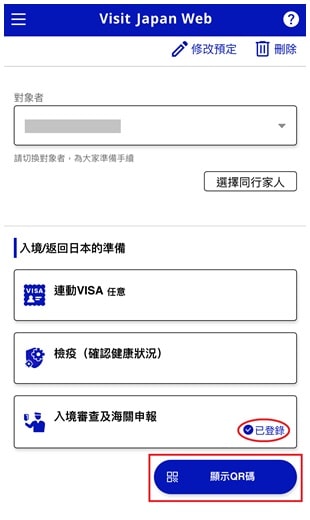
6. Presenting the Japan Entry QR Code at Immigration
Upon arrival in Japan, you’ll first go through the immigration checkpoint. Here, in addition to presenting your passport, boarding pass, and having your photo taken (children are exempt from the photo), you’ll also need to show the Immigration and Customs Declaration QR Code (referred to as the Japan Entry QR Code) for scanning by the officer. If your account includes family members traveling with you, each person must present their own Japan Entry QR Code.
To display the Japan Entry QR Code:
- On the account homepage, click on the registered entry plan;
- Then click the 「Show QR Code」 button under “Immigration and Customs Declaration”;
- In the pop-up window, click 「Agree and Show QR Code」 to generate the Japan Entry QR Code.
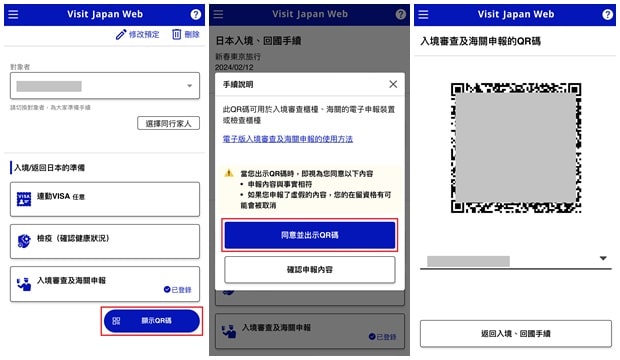
Note: If your account includes multiple family members, you can select the traveler whose QR Code you want to display from the dropdown menu.
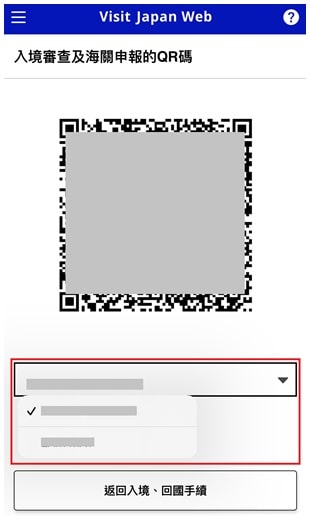
Most features of “Visit Japan Web” require an internet connection, but the Japan Entry QR Code can be displayed offline. This means you can still present the QR Code even without internet access upon arrival. The method for displaying the QR Code offline is the same as described above.
Important: To display the Japan Entry QR Code offline, you must log in to your account while online and keep the account logged in. It’s recommended to log in before boarding your flight and avoid closing the browser app. You can then turn off your phone or enable airplane mode during the flight.
Alternatively, you can follow the official guide to add the webpage to your phone’s home screen, allowing offline access to the Japan Entry QR Code.
8. Presenting the Japan Entry QR Code at Customs
After completing immigration procedures, proceed to collect your checked luggage. Once you’ve retrieved your bags, you’ll need to pass through customs inspection. Here, you must present each person’s passport and Immigration and Customs Declaration QR Code. The method for displaying the QR Code is the same as at immigration. Only one QR Code per family is required for customs.
Additional Features and Uses
“Visit Japan Web” is primarily used for immigration and customs declarations, but it also offers additional features, including:
- Processing tax-free shopping refunds;
- Searching for medical facilities in Japan;
- Viewing emergency information;
- Purchasing travel insurance.
Below are explanations of the more useful features: tax-free shopping and medical facility searches.
1. Processing Tax-Free Shopping Refunds
Foreign tourists in Japan can claim tax refunds (or shop tax-free) for purchases over 5,000 yen. When requesting a refund (or tax-free purchase), the staff will ask to see your passport to verify your details and the “Landing Permission” stamp. To make this process more convenient, “Visit Japan Web” offers a “Generate Tax-Free QR Code” feature. With this QR Code, you can present it instead of your passport when requesting tax-free shopping.
However, this feature isn’t widely useful yet. Pulling out your phone to show the QR Code isn’t significantly more convenient than presenting your passport, and if you’re logged out due to inactivity, re-logging in can be cumbersome. Additionally, many stores still don’t accept the QR Code, so showing your passport remains the standard.
To generate a Tax-Free QR Code, you must use the passport photo capture method when registering your personal data and save the photo. After arriving in Japan, you’ll also need to take a photo of the “Landing Permission” stamp.
Steps to generate the Tax-Free QR Code:
【1】 On the account homepage, click 「Procedures During Stay in Japan」, select the person (if multiple are registered), then click 「Generate Tax-Free QR Code」, followed by 「Next」. Finally, take a photo of the “Landing Permission” stamp affixed to your passport during immigration to complete the process.
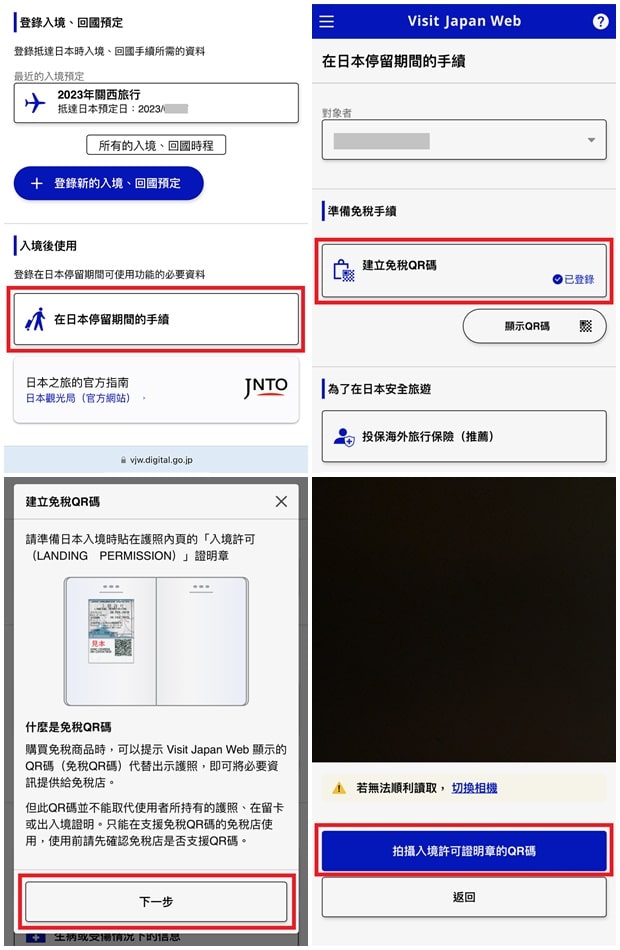
Note: The Tax-Free QR Code is valid for the duration of your stay. If you re-enter Japan before the expiration date, you’ll need to generate a new QR Code with the latest “Landing Permission” stamp.
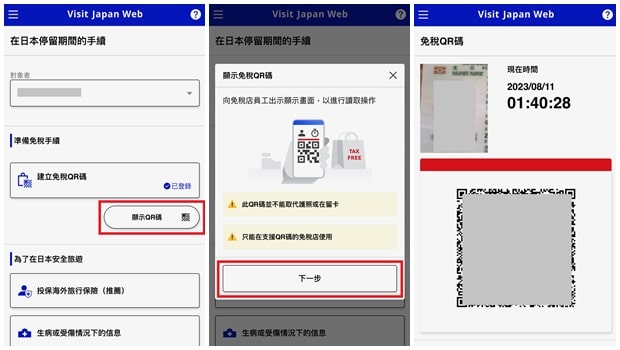
【2】 When shopping in Japan, to display the Tax-Free QR Code, click 「Generate Tax-Free QR Code」, then 「Show QR Code」, and finally 「Next」 to generate the code.
2. Seeking Medical Care During Your Trip
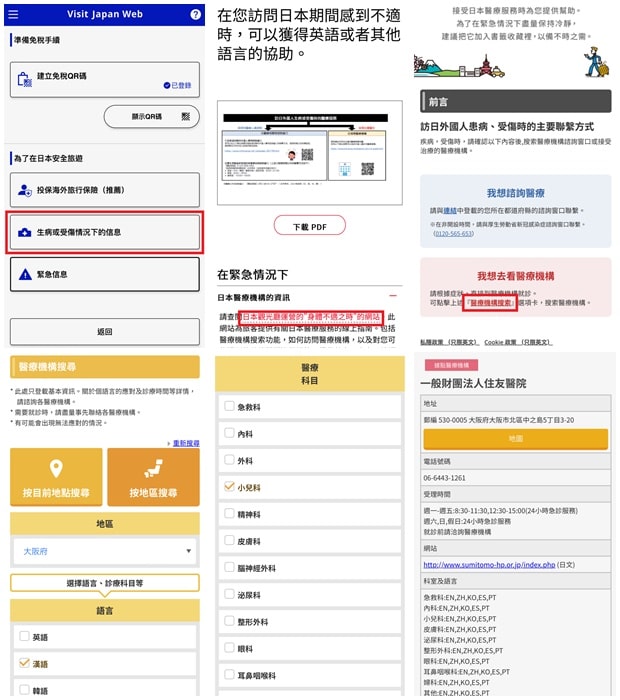
Falling ill while traveling is a major concern, especially when traveling with children. The biggest worries are finding a hospital and overcoming language barriers. To assist foreign visitors, the Japan Tourism Agency provides a “Guide for When You Feel Unwell” website, which can also be accessed via “Visit Japan Web.”
The site offers guidance for emergencies and medical care in Japan, along with a search function to find medical facilities based on location or specific criteria, such as Chinese-speaking staff or pediatric services.
____________________
Below are the official resources for “Visit Japan Web”:
Related posts:
- Tateyama Kurobe Opening Dates, Transportation, Attractions, Luggage Delivery, and Travel Guide
- Guide to Purchasing Tateyama Kurobe Tickets, Train Tickets, JR Passes, and Booking Ride Times
- Tateyama Kurobe Snow Otani: Opening Hours, Snow Wall Height, and Travel Guide
- Tateyama Kurobe Travel Guide: One-Day Itinerary and Recommended Routes (JR and Self-Driving)
- Alpine-Takayama-Matsumoto Area Tourist Pass: Purchase, Exchange, Usage, and Riding Guide
- Japan Universal Studios Tickets, Fast Pass, VIP Tour: Official Website Purchase Guide
- Osaka Mint Bureau Sakura Avenue Reservation Guide
- Japan Kyushu Kawachi Fujien: Wisteria Blooming Season, How to Purchase Tickets, and Transportation Guide
- Osaka Light Festival: Event Details, Schedule, Venues and Transportation
- Japan Toyota Rent a Car Guide: Official Website Rental Process and Discounts!
- Kaiten-Sushi Nemuro Hanamaru: Locations, Crowds, Reservations and Queue-Skipping Tips for Tokyo and Sapporo Branches
- Japan Accommodation Tax: Which Cities Levy It? Who Needs to Pay? How to Pay?
- Japan Rakuten Travel Promo Codes, Latest Discounts, and Booking Tutorial
- How to get and use the 10% Agoda Discount Code


